I'm curious if anyone's done this before? Not repairing the A/C, but installing a system in a car that has none.....
I'm moving this project up on my Euro restoration car (77 528) because the car is otherwise generally unusable in my Texas climate.
I'm dividing my installation into three stages as my restoration is being done one major project at a time with some driving
in between.
Stage 1 (in progress): Switch to U.S. center console and install the blower box with a new fan. I call it U.S. as the donor car is for these parts - clearly the center console front and side panels are different for A/C cars. Even the extra fan will help before A/C is actually in. As I just had all the carpet out, I took the time to drill three new holes for later: condensate drain and the hi-side/low-side lines behind the glove box to the engine bay. Fortunately, I was able to precisely place these using measurements from my 530i. I'm cleaning up a donor blower box from a 79 E24 (E28 box also interchangeable, or at least from 84 528e). Latest headache here is discovering the need for peripheral parts, notably the base plate and the "covering piece" which is duct work.
https://www.realoem.com/bmw/enUS/showpa ... Id=64_0361
The base plate is shared with E28 and E24, so I can probably locate used. I expect a bit of fabrication need to close the gap for the covering piece.
Stage 2: A/C components in the interior, namely the evaporator and expansion valve. I have these new for the E28 and will be going that route of aluminum lines and o-rings. I'm probably also buying a bender for aluminum tubing.
Stage 3: Everything in the engine bay. Relatively easier for me since I did all this in converting my 530i to R134a...There's also
more room out there to customize and I can leverage various A/C kits and parts from other M30 cars. I already got the compressor stuff here since it's direct application for us with that nice bracket from our E28 friends: https://www.acsolutions.co/
There's a little bit of light wiring to navigate in all this as well.
I'll drop some pictures later.
Robert
A/C installation from scratch
-
Robert Bondi

- Posts: 402
- Joined: Sun Jan 11, 2009 12:33 am
- Location: Austin, TX
A/C installation from scratch
Robert
77 530i
77 Euro 528
77 530i
77 Euro 528

Re: A/C installation from scratch
I did it on a Bavaria long ago. Pretty straightforward except I neglected to do the evaporator drain hole. A few weeks after installation I heard this sound of water hitting a fan. Then soon I got some splashing up on my feet. Ooops. Not wanting to R and R the whole thing I improvised, which worked well for the next 100K or so until it was rear ended and totaled. I should say the improvised drain worked well, the Bav A/C as weak even after I replaced the old square York compressor with a E12 era swashplate one, it had a smaller blower and housing than E12s.
It's definitely doable. A bit of a challenge drilling the holes in the firewall for the lines, but again, doable. I may have that base mounting plate if it's the same as E28s, shoot me your email and I'll send a pic off.
It's definitely doable. A bit of a challenge drilling the holes in the firewall for the lines, but again, doable. I may have that base mounting plate if it's the same as E28s, shoot me your email and I'll send a pic off.
Mike W.
02 525ita. Wife's, aka grocery getter
02 530i. New to the fleet, 3 pedals.
03 QX4, AKA the Datsun. Finally got the 4WD vacationmoble to stop smoking.
07 Xterra. Still on the DL, a purchase from hell.
02 525ita. Wife's, aka grocery getter
02 530i. New to the fleet, 3 pedals.
03 QX4, AKA the Datsun. Finally got the 4WD vacationmoble to stop smoking.
07 Xterra. Still on the DL, a purchase from hell.
-
Robert Bondi
- Posts: 402
- Joined: Sun Jan 11, 2009 12:33 am
- Location: Austin, TX
Re: A/C installation from scratch
Hi Mike,
PM sent. Thanks for sharing...that's encouraging. My hole saws went through the firewall surpisingly easy and I was working from the inside. Deciding exactly where to drill them was a bit of worry...
Robert
PM sent. Thanks for sharing...that's encouraging. My hole saws went through the firewall surpisingly easy and I was working from the inside. Deciding exactly where to drill them was a bit of worry...
Robert
Mike W. wrote: Sat Feb 17, 2024 12:42 pm I did it on a Bavaria long ago. Pretty straightforward except I neglected to do the evaporator drain hole. A few weeks after installation I heard this sound of water hitting a fan. Then soon I got some splashing up on my feet. Ooops. Not wanting to R and R the whole thing I improvised, which worked well for the next 100K or so until it was rear ended and totaled. I should say the improvised drain worked well, the Bav A/C as weak even after I replaced the old square York compressor with a E12 era swashplate one, it had a smaller blower and housing than E12s.
It's definitely doable. A bit of a challenge drilling the holes in the firewall for the lines, but again, doable. I may have that base mounting plate if it's the same as E28s, shoot me your email and I'll send a pic off.
Robert
77 530i
77 Euro 528
77 530i
77 Euro 528
-
Robert Bondi
- Posts: 402
- Joined: Sun Jan 11, 2009 12:33 am
- Location: Austin, TX
Re: A/C installation from scratch
Some picture updates...
I scored the base plate for the evaporator box. It supposedly from an 84 528e. One problem solved. You can also see the
condensate drain in the center.
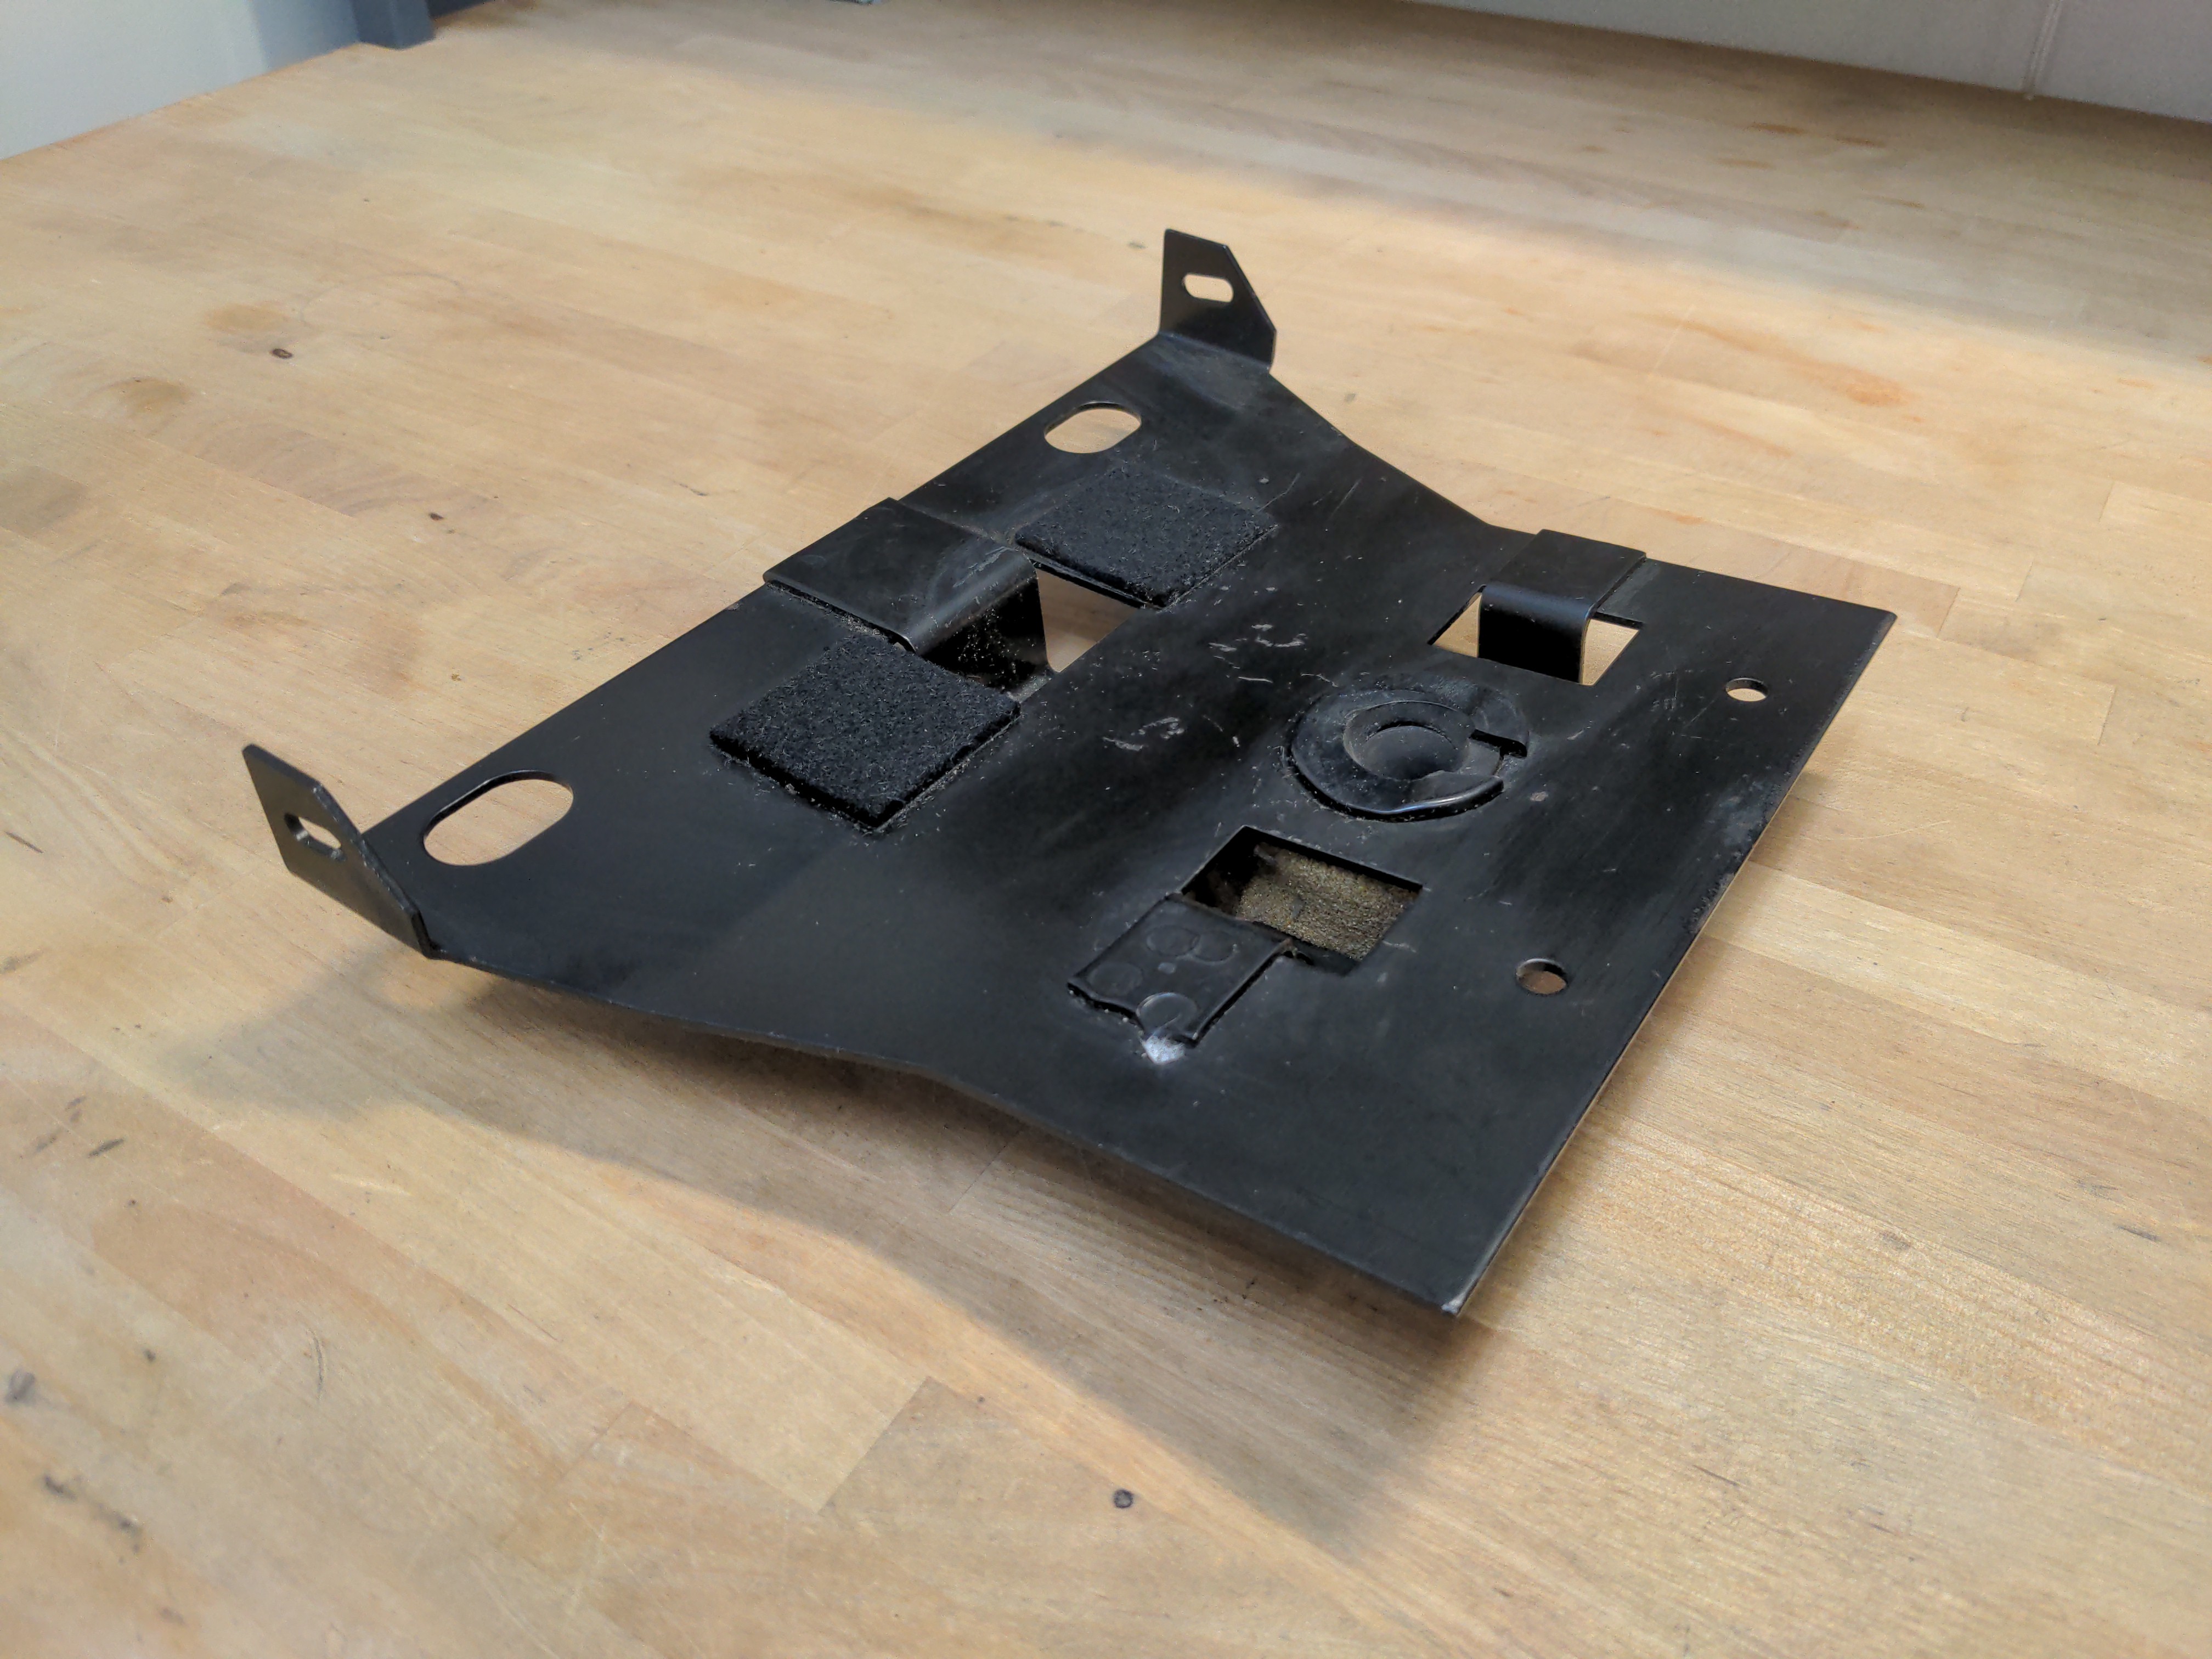
Here's the duct work blank plate off my non-AC car. Presumably, this is just removed and the "covering piece" is swapped
in to take the output of the evaporator blower box. I expect I'll be creating something out of plastic and flexible duct work.
Surprisingly, this plate is just held in by 3 of those Christmas tree type nylon fasteners so common on modern cars. Fortunately, the E12
has very few of these.


I scored the base plate for the evaporator box. It supposedly from an 84 528e. One problem solved. You can also see the
condensate drain in the center.
Here's the duct work blank plate off my non-AC car. Presumably, this is just removed and the "covering piece" is swapped
in to take the output of the evaporator blower box. I expect I'll be creating something out of plastic and flexible duct work.
Surprisingly, this plate is just held in by 3 of those Christmas tree type nylon fasteners so common on modern cars. Fortunately, the E12
has very few of these.
Robert
77 530i
77 Euro 528
77 530i
77 Euro 528
Re: A/C installation from scratch
Have not tried to install a complete system on an e12, but I did install an ICE Air kit on my 2002tii, which never had a/c before I bought it. You have already identified the scariest part of the job, which is drilling through the firewall. Measure again and again for about a month, then drill once! Obviously your ac car can give you some guidance as to where to put those holes, but it’s still hair-raising. Watch out for brake lines and wires!
Finding all the parts is the next most daunting task, which is why i bought the available kit. Did not have the courage of my convictions. Might do it piecemail if I had it to do over again. Good luck with that part.
In fat, as you know, that’s what I’m doing now on my 528i. Have the acsolutions bracket and a Sanden, and have located a 17x19 parallel flow condensor at Vintage Air just up the road from you which I think will fit the apron opening just about right. Still searching for the right drier.
Also thinking about how to upgrade the anemic blower and evaporator. Spent a good part of today getting the evaporator box exposed for removal and will pluck it tomorrow. Looking at the blower fan, i’m not sure it’s not even smaller than the e9 fan. That said, there seems to be enough room under the dash for a bigger unit, like your e28 box. Also, it looks like it may be possible to put an e28 fan in the e12 box. I have what I think is an e28 box and will try to test fit it. Has a much bigger hamster wheels than my e12 unit; also, the info I’m getting from various vendors indicates the bigger e28 fan may fit in the e12 box. I know you have mix and match parts as well, and may be trying similar. So, much experimentation coming up in the next weeks. Will follow this thread with interest. Good luck to us!
-
Robert Bondi
- Posts: 402
- Joined: Sun Jan 11, 2009 12:33 am
- Location: Austin, TX
Re: A/C installation from scratch
I've finally shifted my focus back to the AC installation on the Euro restoration car. Talking with Ken (0257) back and forth on the refresh of his AC system over the last year helped me plan and solidify what needs to be done. The interior really boils down to acquiring/rebuilding these three components:
1. Climate control panel
2. Heater core enclosure box
3. Evaporator box
Then, there's a little bit of wiring and the hard line plumbing for the evaporator. Holes for the evap lines and the condensate drain were already made well over a year ago.
I recently rebuilt the climate control panel. I elected to keep the nice panel in German from the 528. I stripped it down to bare panel with the illumination back plate and then had several used climate panels from US A/C cars for the extra parts. The FAQ on the rotary switch is a good reference here. Aside from reassembly and the cleaning and lubrication of parts, I converted the non-A/C Euro panel into an A/C ready climate panel with these 5 additions:
1. thermostat switch and capillary probe line (Ranco)
2. 5 terminal relay (BMW 61311243086, Bosch 0332204402)
3. microswitch (Burgess GVBF6)
4. plastic crescent cam that slides onto the AC dial knob - this actuates the microswitch
5. 4 additional A/C fan contacts needed to be populated on bottom of the rotary switch
I couldn't make sense of all the numbering on the Ranco switch to identify what is actually the part number buried in other information. The microswitch is actually fairly generic...I recently replaced a switch just like it for my microwave door not long ago.
Front of the Euro climate control panel. Note the P/N last 7 digits on the climate panel harness on the left....NLA of course. One of my used US panels had most of this harness present, so great opportunity to splice into existing wiring and label my work.

Back of climate control panel during reassembly

Back of climate control panel after reassembly and labeling/identification of all wires

I'm now rebuilding the heater core enclosure, which is likely the next thread update.
1. Climate control panel
2. Heater core enclosure box
3. Evaporator box
Then, there's a little bit of wiring and the hard line plumbing for the evaporator. Holes for the evap lines and the condensate drain were already made well over a year ago.
I recently rebuilt the climate control panel. I elected to keep the nice panel in German from the 528. I stripped it down to bare panel with the illumination back plate and then had several used climate panels from US A/C cars for the extra parts. The FAQ on the rotary switch is a good reference here. Aside from reassembly and the cleaning and lubrication of parts, I converted the non-A/C Euro panel into an A/C ready climate panel with these 5 additions:
1. thermostat switch and capillary probe line (Ranco)
2. 5 terminal relay (BMW 61311243086, Bosch 0332204402)
3. microswitch (Burgess GVBF6)
4. plastic crescent cam that slides onto the AC dial knob - this actuates the microswitch
5. 4 additional A/C fan contacts needed to be populated on bottom of the rotary switch
I couldn't make sense of all the numbering on the Ranco switch to identify what is actually the part number buried in other information. The microswitch is actually fairly generic...I recently replaced a switch just like it for my microwave door not long ago.
Front of the Euro climate control panel. Note the P/N last 7 digits on the climate panel harness on the left....NLA of course. One of my used US panels had most of this harness present, so great opportunity to splice into existing wiring and label my work.
Back of climate control panel during reassembly
Back of climate control panel after reassembly and labeling/identification of all wires
I'm now rebuilding the heater core enclosure, which is likely the next thread update.
Robert
77 530i
77 Euro 528
77 530i
77 Euro 528
-
Robert Bondi
- Posts: 402
- Joined: Sun Jan 11, 2009 12:33 am
- Location: Austin, TX
Re: A/C installation from scratch
Heater core enclosure now rebuilt and installed. I had acquired a used box from a 79 528i to rebuild on the bench and swap in. This component was fairly straight-forward. I took everything apart, cleaned it, and lubricated moving parts. The heater fan motor was new as of 2018 and reused. New parts included a heater core from Walloth and Nesch, NOS heater water valve, and a new resistor cage. All foam replaced. Highlight pictures:
Carefully splitting the box apart and revealing cleaning opportunities.

Close-up of new heater water valve.

Newly foamed vent flaps and sizing up heater core for install. Unlike the old Behr unit, this earlier? design has no nylon side tanks and appears to be all brass. Only downside is support attachment point for input brass pipe also missing, so we'll install a custom support solution.

New heater/vent fan resistor cage

Custom support aluminum bracket and nylon standoff for brass input pipe

Pressure testing the heater core.

Views of the rebuilt heater core enclosure before install. Red gasket is silicone foam.


Carefully splitting the box apart and revealing cleaning opportunities.
Close-up of new heater water valve.
Newly foamed vent flaps and sizing up heater core for install. Unlike the old Behr unit, this earlier? design has no nylon side tanks and appears to be all brass. Only downside is support attachment point for input brass pipe also missing, so we'll install a custom support solution.
New heater/vent fan resistor cage
Custom support aluminum bracket and nylon standoff for brass input pipe
Pressure testing the heater core.
Views of the rebuilt heater core enclosure before install. Red gasket is silicone foam.
Robert
77 530i
77 Euro 528
77 530i
77 Euro 528

Re: A/C installation from scratch
Neat and fastidious work as always, Robert. Have you mounted the compressor and all the lines yet?
PS. We see the Spal fan box in the background.
PS. We see the Spal fan box in the background.
(oo=00=oo) Eric
1981 528i Manual
1981 528i Manual
-
Robert Bondi
- Posts: 402
- Joined: Sun Jan 11, 2009 12:33 am
- Location: Austin, TX
Re: A/C installation from scratch
Hey Eric. Not yet, but getting there.... My strategy is doing all the interior work as the first phase of the project. I'm currently bending the aluminum hard lines going through the firewall. The second phase of the AC will be doing all the work in the engine bay beyond the receiver/drier. I'm almost done with the evaporator box and will post some of those highlights.
528i-1981 wrote: Sat Dec 27, 2025 10:32 pm Neat and fastidious work as always, Robert. Have you mounted the compressor and all the lines yet?
PS. We see the Spal fan box in the background.
Robert
77 530i
77 Euro 528
77 530i
77 Euro 528
-
Robert Bondi
- Posts: 402
- Joined: Sun Jan 11, 2009 12:33 am
- Location: Austin, TX
Re: A/C installation from scratch
The AC project is now half complete with everything done on the interior side. It's worth highlighting some of the work on the evaporator box where a bit of creativity was required. Having acquired 3 different boxes, I was able to choose the most appropriate and best condition unit to rebuild. I think most E28 and E24 units would work with better chances sticking to earlier models.
An oddity for the E24 is that it uses an NPN power transistor instead of a resistor pack like the E28 to provide different fan speeds. After acquiring some E24 schematics (thanks tschultz), I learned the E24 climate system uses many NPN transistors; therefore, to keeps things simple and most like the E12, I decided that sticking with the E28 solution was the way to go.
Comparison of E24 with transistor vs. E28 Resistor Cage

The 86 528e box was in the best condition. However, I then noticed that the condensate drain changed over the years and was much longer for this unit. I don't think that would even fit for installation clearance. See comparison of all 3 units. I ultimately found that I could use the bottom half of my 79 E24 evap box for the shorter condensate drain with the top half of the 86 528e box to use the R cage. Main notable is that only 7 of 10 clips can be used to attach top and bottom because the earlier units only used 7 metal clips.

The E12 evap resistor (R) cage is NLA, but the E28 part is still available. I confirmed that the resistors are the same; it's just the electrical connections that are different with the E28 using round pins vs. the flat spade terminals for the E12. I made a nice E28 pigtail adapter since both of my E28 units had the wiring cutoff with those connectors included.


One advantage of this project taking forever is I managed to source the "intermediate piece" duct work for the evaporator outlet that replaces the blank-off plate for a non-AC car. Here's the side-by-side comparison.

Intermediate piece installation with all new foam. The grey foam is nice and very compressible (https://www.blenddoorusa.com). Credit to Ken for that find.

Comparison of old and new Four Seasons E28 evaporator. I don't expect the E28 parts to perform better than the E12, but they're just easier to source. I do think the o-ring seals are easier to work with than the copper flare seals.

#6 Aluminum hard line bent, installation of the new expansion valve, and some fin straightening with the green tool.

New foam and fit testing of the evaporator. Block foam forces all the air to go through the fins rather than bypass on the perimeter. The bend/fit iterative cycle seemed endless when working on the hard lines going through the firewall.


Pressure testing with inert gas. Discovering a leak after installing the box would be terrible. I'm just using inert MIG welding gas (Ar/CO2 mix). IIRC, I held about 99psi for 36 hours and declared it good.

Hard line bending the #10 aluminum output line that will go through the firewall.

Shots of the finished evaporator box ready to install.


I believe in insulating everything. Any condensation on metal surfaces outside of the evaporator core is lost efficiency. Here is cork/asphalt tape going on the interior hard lines. It worked nicely and installs like chewing gum. It's also useful to help block air leakage where the hard lines emerge from the evap box (OEM work did this). The red stuff everywhere is 1/4" thick silicone foam from McMaster-Carr

These brackets are needed at the back of the evaporator base plate. They provide fastening points to the side intake vent panels on the center console. I was missing these brackets. Fortunately, I have my 530i for reference. I copied the black steel brackets in 1/16" aluminum using some careful vice/hammer work and the Dremel tool.

Evaporator box installed. Bundle of ground wires mostly from the climate control panel are also seen in the foreground.

I'll break this update into a second part with more completion pics....
An oddity for the E24 is that it uses an NPN power transistor instead of a resistor pack like the E28 to provide different fan speeds. After acquiring some E24 schematics (thanks tschultz), I learned the E24 climate system uses many NPN transistors; therefore, to keeps things simple and most like the E12, I decided that sticking with the E28 solution was the way to go.
Comparison of E24 with transistor vs. E28 Resistor Cage
The 86 528e box was in the best condition. However, I then noticed that the condensate drain changed over the years and was much longer for this unit. I don't think that would even fit for installation clearance. See comparison of all 3 units. I ultimately found that I could use the bottom half of my 79 E24 evap box for the shorter condensate drain with the top half of the 86 528e box to use the R cage. Main notable is that only 7 of 10 clips can be used to attach top and bottom because the earlier units only used 7 metal clips.
The E12 evap resistor (R) cage is NLA, but the E28 part is still available. I confirmed that the resistors are the same; it's just the electrical connections that are different with the E28 using round pins vs. the flat spade terminals for the E12. I made a nice E28 pigtail adapter since both of my E28 units had the wiring cutoff with those connectors included.
One advantage of this project taking forever is I managed to source the "intermediate piece" duct work for the evaporator outlet that replaces the blank-off plate for a non-AC car. Here's the side-by-side comparison.
Intermediate piece installation with all new foam. The grey foam is nice and very compressible (https://www.blenddoorusa.com). Credit to Ken for that find.
Comparison of old and new Four Seasons E28 evaporator. I don't expect the E28 parts to perform better than the E12, but they're just easier to source. I do think the o-ring seals are easier to work with than the copper flare seals.
#6 Aluminum hard line bent, installation of the new expansion valve, and some fin straightening with the green tool.
New foam and fit testing of the evaporator. Block foam forces all the air to go through the fins rather than bypass on the perimeter. The bend/fit iterative cycle seemed endless when working on the hard lines going through the firewall.
Pressure testing with inert gas. Discovering a leak after installing the box would be terrible. I'm just using inert MIG welding gas (Ar/CO2 mix). IIRC, I held about 99psi for 36 hours and declared it good.
Hard line bending the #10 aluminum output line that will go through the firewall.
Shots of the finished evaporator box ready to install.
I believe in insulating everything. Any condensation on metal surfaces outside of the evaporator core is lost efficiency. Here is cork/asphalt tape going on the interior hard lines. It worked nicely and installs like chewing gum. It's also useful to help block air leakage where the hard lines emerge from the evap box (OEM work did this). The red stuff everywhere is 1/4" thick silicone foam from McMaster-Carr
These brackets are needed at the back of the evaporator base plate. They provide fastening points to the side intake vent panels on the center console. I was missing these brackets. Fortunately, I have my 530i for reference. I copied the black steel brackets in 1/16" aluminum using some careful vice/hammer work and the Dremel tool.
Evaporator box installed. Bundle of ground wires mostly from the climate control panel are also seen in the foreground.
I'll break this update into a second part with more completion pics....
Robert
77 530i
77 Euro 528
77 530i
77 Euro 528
-
Robert Bondi
- Posts: 402
- Joined: Sun Jan 11, 2009 12:33 am
- Location: Austin, TX
Re: A/C installation from scratch
Here are a few more interior side completion pics. I'm calling this the AC half system. I brought the aluminum hard lines (Vintage Air) through the firewall and placed the Vintage Air drier as well. Routing follows very closely the stock E12 system using my 530i for reference. The half system is capped and pressurized with inert gas until I can complete the rest of it.


Even without AC yet, just having the evaporator box and that new blower fan motor is an enormous improvement in forced ventilation vs. the heater/vent blower fan.
I cleaned up and/or restored all the relevant panels to complete the center console. It's a significant change from the usual Euro console to accommodate the evaporator, but I went out of my way to rebuild the Euro climate panel to preserve all the German labeling. The goal was to strongly preserve a stock look (U.S. stock) without any externally visible hacks. Extra wiring still seen includes future stereo installation and a 3-gauge pod.
Robert
77 530i
77 Euro 528
77 530i
77 Euro 528
-
Theotherotter
- Posts: 90
- Joined: Mon May 15, 2023 6:16 pm
Re: A/C installation from scratch
Outstaning content - thanks for documenting this.
-
Robert Bondi
- Posts: 402
- Joined: Sun Jan 11, 2009 12:33 am
- Location: Austin, TX
Re: A/C installation from scratch
No problem. The obscure interchange possibilities are often invaluable for future attempts.
Robert
Robert
77 530i
77 Euro 528
77 530i
77 Euro 528
-
Theotherotter
- Posts: 90
- Joined: Mon May 15, 2023 6:16 pm
Re: A/C installation from scratch
I recently saw an interchange parts list for a Maserati Biturbo that obviously had a lot of research and trial and error behind it, because there were really unexpected interchanges from totally different vehicles on it. Haven’t seen any non-BMW parts interchanges for these cars.
Re: A/C installation from scratch
Robert, this is your usual perfectionism. Beautifully done. And it looks like I could eat of your garage floor, so there’s that.
(oo=00=oo) Eric
1981 528i Manual
1981 528i Manual